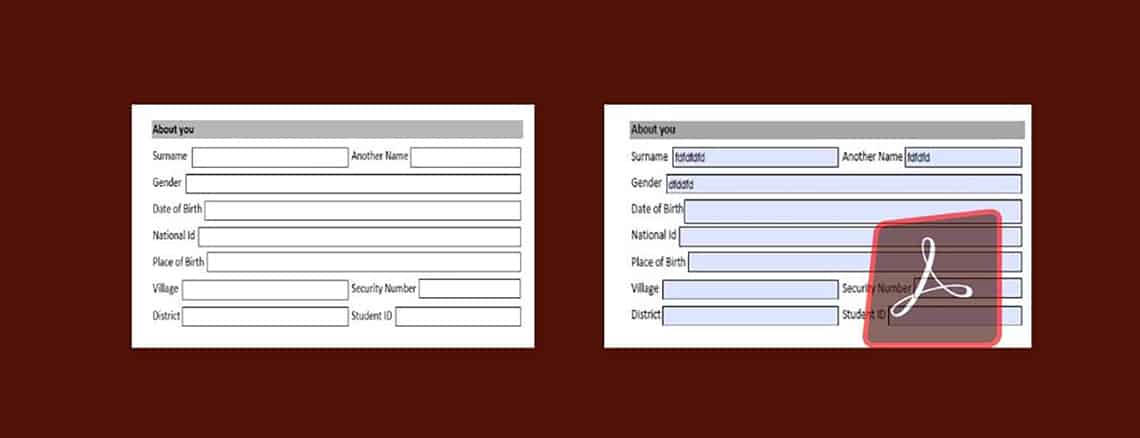
What is a fillable PDF?
Fillable PDF forms work the same as any other online form. You may enter information, select items from drop-down boxes, and also check fields as needed. You can complete the form online or save a copy of the form on your computer and use any modern PDF Reader to fill in the form.
Uses of Fillable PDFs
- Unlike traditional paper-based forms which are often a headache to complete by hand, PDF fillable forms are convenient and offer a broad range of user interactivity.
- Distributing and collecting electronic forms can significantly reduce paper consumption, thereby helping you run a “greener” office.
- Users can easily open, fill in and submit forms within their web browser or they can save a form on their computer, fill it in offline, then print the form to fax, mail, or hand-deliver.
- Why deal with messy and hard-to-read handwriting when it can be prevented? Fillable forms provide 100% clear and legible on-screen text.
How to implement it in a web application?
I have worked on a project where clients will digitally sign the documents which are shared with them. They were interested in additionally updating some fields in the document digitally.
Technologies Used
- Angular 10
- Java 8
Two-Step process
This is a two-step process as outlined below.
- The first step is on the front-end and uses Angular to get the details from the user on the updates to be made to the PDF.
- The second step is on the back-end and uses Java to write the user-given details into the PDF Form and make the file downloadable.
I am using REST API to send form details to the backend.
Front end — Angular
Prerequisite: we use the angular open-source library ng2-pdf-viewer component written by Vadym Yatsyuk to let the user view the PDF and make updates to it. This is a PDF Viewer component implemented using pdf.js.
Ng2-pdf-viewer has a predefined event which will notify when the PDF load has completed and rendered successfully. It will also provide PDFDocumentProxy which contains PDF annotations and form field objects.
PDF annotations have details like field type, default value, etc., We have three types of fields: Tx, Ch, and Btn.
- Tx is a plain text field.
- Ch is a dropdown field.
- Btn has 3 subtypes: radio, checkbox, and button.
Note: I will elaborate on how to differentiate between the radio button and the checkbox.
Step 1: Install Ng2-pdf-viewer
Using npm, add ng2-pdf-viewer to your existing angular application.
npm install ng2-pdf-viewer
Note: See dependency chart here.
Step2: Setup PDF Preview
Use the above library to preview the PDF.
<pdf-viewer [src]="<link to pdf>"
[render-text]="true"
[original-size]="false"
(after-load-complete)="loadCompleted($event)"
></pdf-viewer>
There are a lot of options available in the library to view a PDF in a Web Application. Please refer to library documentation for more details.
Step3: Get PDFDocumentProxy and Structure Form Fields
public loadCompleted(pdf: PDFDocumentProxy): void {
this._currentFormValues = [];
for (let i = 1; i <= pdf.numPages; i++) {
// track the current page
pdf.getPage(i).then(p => {
return p.getAnnotations();
}).then(ann => {
const annotations = (<any>ann) as PDFAnnotationData[];
annotations
.filter(a => a.subtype === 'Widget')
.forEach(a => {
this._createInput(a);
});
});
}
}
The above code will get all annotations and filter out only form fields.
private _createInput(annotation: PDFAnnotationData): void {
const input = new PDFFillableField();
input.name = annotation.fieldName;
input.id = annotation.id;
switch (annotation.fieldType) {
case "Tx":
input.type = PdfFieldTypeEnum.TEXT;
input.value = annotation.buttonValue || '';
break;
case "Ch":
input.type = PdfFieldTypeEnum.DROPDOWN;
input.value = annotation.buttonValue || '';
break;
case "Btn":
if (annotation.checkBox) {
input.type = PdfFieldTypeEnum.CHECKBOX;
input.value = true;
} else {
input.type = PdfFieldTypeEnum.RADIO;
input.value = annotation.buttonValue;
}
break;
default:
input.type = PdfFieldTypeEnum.TEXT;
input.value = annotation.buttonValue || '';
}
this._formFields.push(input);
}
The above code will create input and set a default value from Object and set it empty otherwise. Also, do note that there is a property called checkBox in the annotation object. If this property is set to true, then it is a checkbox or a radio button otherwise. In the above code, you can see the if-condition to check this and assign default values based on that.
A checkbox will have a default value of true. We will handle this later and change it to false if the user didn’t select the checkbox.
On the other hand, the radio button’s default value is an integer number which is the order of the button starting from 0. We will be sending selected radio buttons’ order numbers to the backend.
Step3: Get form values from PDF
PDF preview will render an annotation layer that has HTML form elements. Use javascript to get values from all form fields.
private _getFieldValues(): void {
this._formFields.map(input => {
const ele = <HTMLInputElement>document.getElementById(input.id);
if (TypeValueUtil.isDefined(ele)) {
if (input.type === PdfFieldTypeEnum.CHECKBOX) {
this.formValues[input.name] = ele.checked;
} else if (input.type === PdfFieldTypeEnum.RADIO) {
if (!ele.checked) {
} else {
this.formValues[input.name] = input.value;
}
} else {
this.formValues[input.name] = ele.value;
}
}
});
}
Step4: Pass Values to the backend
The formvalues object will have all details about the field and user-entered values. Use REST API to pass this payload to the Backend.
// FormValues field will have below details
class PDFFillableField {
name: string;
value : any;
type: string;
id: string;
}
Backend — Java
On the back end, we will be using apache pdfbox in Java to set values to the PDF form.
The Apache PDFBox® library is an open-source Java tool for working with PDF documents. This project allows the creation of new PDF documents, manipulation of existing documents, and the ability to extract content from documents. Apache PDFBox also includes several command-line utilities. Apache PDFBox is published under the Apache License v2.0.
The Below code will get values from UI and append them to the actual PDF. Load needed PDF document using PDPageContentStream into PDDocument. I resorted to sending the document in bytes.
PDDocument overlayDoc = new PDDocument();
PDPage page = new PDPage();
overlayDoc.addPage(page);
Overlay overlayObj = new Overlay();
PDFont font = PDType1Font.TIMES_ITALIC;
PDPageContentStream contentStream = new PDPageContentStream(overlayDoc, page);
PDDocument originalDoc = PDDocument.load(inputDocumentContents);
PDDocumentCatalog docCatalog = originalDoc.getDocumentCatalog();
try {
// Fillable PDF
if (null != docCatalog.getAcroForm()) {
fillPDFFields(docCatalog.getAcroForm(), values);
}
// Make PDF form fields readOnly.
originalDoc.setAllSecurityToBeRemoved(true);
} finally {
overlayObj.close();
overlayDoc.close();
originalDoc.close();
}
You might have noticed that setAllSecurityToBeRemoved is set to true. This will make the PDF Form Fields readyOnly. This is to ensure that the user is not able to edit the same value again when he downloads the same PDF and opens it.
Note: setAllSecurityToBeRemoved is an optional parameter. Set value for it based on your requirement.
Set Values in PDF
private void fillPDFFields(PDAcroForm acroForm,
Map<String, Object> fieldValues) throws IOException {
if (null != fieldValues) {
List<PDField> fields = acroForm.getFields();
fields.forEach((field) -> {
String fieldName = field.getFullyQualifiedName();
try {
String value = fieldValues.get(fieldName) == null ? "" : String.valueOf(fieldValues.get(fieldName));
if (StringUtils.isNotEmpty(value)) {
if ("Tx".equals(field.getFieldType())) {
PDTextField textField = (PDTextField) field;
textField.setValue(value);
} else {
if (field instanceof PDCheckBox) {
PDCheckBox checkBox = (PDCheckBox) field;
if ("true".equalsIgnoreCase(value)) {
checkBox.check();
} else {
// Make unchecked checkbox to false
checkBox.unCheck();
}
} else if (field instanceof PDRadioButton) {
PDRadioButton pdRadioButton = (PDRadioButton) field;
pdRadioButton.setValue(Integer.parseInt(value));
} else if (field instanceof PDComboBox) {
PDComboBox pdComboBox = (PDComboBox) field;
pdComboBox.setValue(value);
}
}
}
} catch (IOException e) {
LOGGER.error("Error while populating value in pdf", e);
}
});
acroForm.flatten();
}
}
The above code will set values to all fields based on their type. Just setting value in Field object will write and append value to PDF.
Text
Set the string value in PDTextField Object.
Checkbox
For the checkbox, if the value from the user is true, then mark PDCheckBox as checked using the check() function. If otherwise, mark it as unchecked using the uncheck() function.
Radio Button
For the Radio button, you have to set an integer value which is the order of the radio button checked starting from 0 in PDRadioButton.
Combobox or Dropdown
It is as simple as the text field. All you have to do is set the string value in the PDComboBox Object.
Finally, once you have set the values in the PDF form, save the document wherever you need to.
Conclusion
I have written this blog based on the technologies I used and it may differ if you use other libraries. However, I hope the approach I followed helps you if you have to implement Fillable PDF in your application.


.png)


.png)


.webp)