

Key takeaways include:
ngFor.
Angular is a popular TypeScript-based front-end framework maintained by Google. It is widely used to build scalable, high-performance single-page applications (SPAs). Originally introduced as AngularJS in 2010, it evolved into Angular 2+ in 2016 with major improvements including TypeScript support, modular architecture, and better tooling.
In this blog, we share 19 Angular best practices for 2026 to help developers build efficient, maintainable, and scalable web applications using modern techniques like lazy loading, state management, component-based design, and virtual scroll.
Today, over 40% of front-end developers use Angular. Given its wide popularity, we thought it would be a constructive activity to highlight a few Angular JS best practices that we are appreciative of
Angular CLI is one of the most powerful tools available when developing apps with Angular. It is a command-line interface tool used to initialize, develop, scaffold, maintain, test, and debug Angular applications.
Angular CLI makes it easy to create an application while following Angular’s recommended standards and best practices. So instead of creating files and folders manually, use Angular CLI to generate components, directives, modules, services, and pipes.
Common CLI commands:
Pro Tip:
Use ng generate component, ng generate service, or ng g shorthand to quickly scaffold features with proper naming and file placement.
Creating a folder structure is an important factor we should consider before initiating our project. A well-structured application makes it easy to scale, understand, and maintain the codebase. It also allows the application to adapt to new changes during development.
Pro Tip:
Use the core folder for singleton services used app-wide, and shared for reusable components, pipes, and directives that span multiple modules.
To ensure a project adheres to proper coding standards, it's important to follow a set of guidelines that promote readability, maintainability, and consistency.
Here are some essential rules to implement:
Pro Tip:
Adopt a linter like ESLint or TSLint with shared configuration across your team to enforce these style rules automatically during development.
TypeScript is a superset of JavaScript designed to develop large-scale applications more effectively. Angular is built using TypeScript because of its powerful features that improve developer productivity and code quality.
You don’t have to convert the entire JavaScript code to TypeScript at once; migration can be done incrementally.
Benefits of using TypeScript include:
Pro Tip:
Use TypeScript interfaces to define consistent data contracts and reduce bugs caused by incorrect object shapes.
ECMAScript (ES) is constantly updated with new features and functionalities. Currently, ES6 (ECMAScript 2015) offers many powerful features that can be leveraged in Angular applications to write cleaner and more concise code.
Key ES6 features to use in Angular:
Pro Tip:
Combine destructuring with default parameters in function arguments for maximum clarity and flexibility in Angular services and components.
When using *ngFor to loop over an array in templates, it is beneficial to use a trackBy function. This function returns a unique identifier for each DOM item, which helps Angular optimize rendering.
Without trackBy, Angular re-renders the entire DOM tree when the array changes. With trackBy, Angular can identify which element has changed and will update only that specific element in the DOM.
Here is an example of how to use ngFor with trackBy:
By returning a unique identifier for each item, trackBy ensures that only updated items are re-rendered, enhancing performance and efficiency.
Pro Tip:
Always prefer item.id over index in production for more predictable rendering, especially when list items can change order.
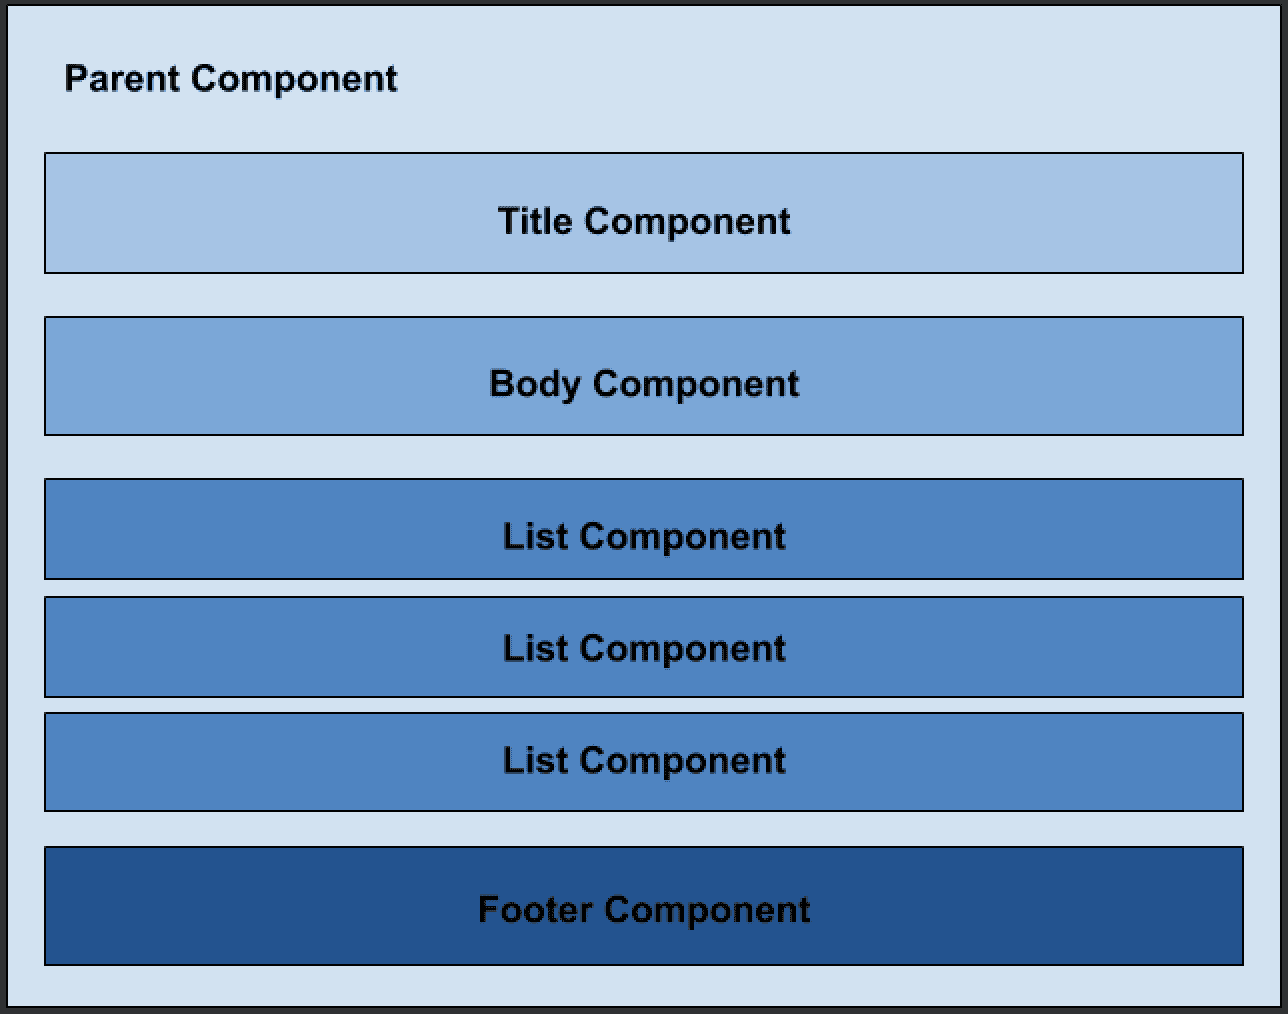
This principle can be seen as an extension of the Single Responsibility Principle. Large components are often difficult to debug, manage, and test. When a component becomes too large, it's beneficial to break it down into smaller, reusable components. This reduces code duplication and makes the application easier to manage, maintain, and debug with less effort.
By following this approach, we can achieve more modular and maintainable code, improving the overall quality and performance of the application.
Pro Tip:
Use Angular’s @Input() and @Output() decorators to manage communication between parent and child components effectively.
To improve the performance of an Angular application, it's essential to lazy load modules whenever possible. Lazy loading ensures that modules are loaded only when they are needed, reducing the initial load time and improving the application's boot time by not loading unused modules.
By using lazy loading, you can significantly enhance the user experience by decreasing the initial loading time and optimizing the overall performance of your Angular application.
Pro Tip:
Use lazy loading with route-level code splitting to keep your main bundle size minimal.
Using an index.ts file helps to consolidate all related exports, making the import statements more concise and easier to manage. This approach reduces the complexity of the import statements and keeps the codebase cleaner. Here's an example of how it works:
Instead of importing each module individually, you can import them all using the folder name:
import { Hero, HeroService, HeroComponent } from '../heroes'; // index is implied
This method simplifies the import process and keeps your code more organized, as you don't need to remember the specific file names for each export. It also makes refactoring easier, as changes in the file structure or file names won't affect the import statements as long as the index.ts file is properly maintained.
Pro Tip:
Use index.ts in every major feature folder (e.g., components, services, models) to centralize and control exports.
Extracting all template logic into a component can improve testability and reduce bugs when the template changes. Here's how you can achieve this:
This approach has logic directly in the template, which can make testing and maintenance harder:
By moving logic from the template to the component, you can simplify the template and make the logic easier to test:
By following this approach, you ensure that all business logic resides within the component, leading to cleaner, more maintainable, and testable code.
Pro Tip:
Keep templates declarative and free of conditionals wherever possible. Use computed properties in the component to handle logic..
When making API calls, some responses remain unchanged for extended periods. In such cases, introducing a caching mechanism can enhance application performance and reduce unnecessary network requests.
Here’s how you can do it effectively:
API Caching Strategy:
Pro Tip:
Use RxJS operators like shareReplay() in Angular services to cache observable responses for repeated use across components.
Angular's async pipe is a powerful tool for working with observables directly in templates. It simplifies the process of subscribing to and unsubscribing from observables, ensuring efficient memory management and preventing memory leaks.
When not using the async pipe, you manually subscribe to observables in the component and handle the subscription lifecycle:
{{ text }}
Pro Tip:
Use async pipes in templates wherever possible to avoid memory leaks and reduce boilerplate code.
In TypeScript, you can enforce that a string variable only accepts specific predefined values by using string literal types. This approach enhances type safety and helps catch potential bugs at compile time.
private vehicleType: string;
With normal string declaration (private vehicleType: string;), TypeScript allows any string value to be assigned to vehicleType, which can lead to unintended bugs if incorrect values are assigned.
Using literal types (private vehicleType: 'four wheeler' | 'two wheeler';), TypeScript restricts vehicleType to only accept the specified literal values ('four wheeler' or 'two wheeler'). Any attempt to assign a value outside of these specified literals will result in a compile-time error, providing early detection of bugs.
Pro Tip:
Use string literal types in models, enums, and service interfaces where options are known and limited.
In TypeScript, proper typing is crucial for maintaining code reliability and facilitating easier refactoring. Let's examine why declaring variables with specific types is essential, using an example to illustrate its benefits:
Consider an interface IProfile that defines specific properties:
In a component LocationInfoComponent, we intend to assign an object to userInfo based on IProfile:
By adhering to proper typing practices in TypeScript, developers can significantly reduce bugs, improve code maintainability, and streamline the development process by catching potential issues early. This approach ensures that the application remains robust and scalable as it evolves.
Pro Tip:
Always define interfaces for data objects and use them in component properties, services, and API responses for strict type enforcement.
State management is a critical aspect of building scalable applications. It allows different components to share and manage application-wide state in a predictable way.
Several libraries are available for Angular state management, including:
Benefits of Using State Management:
Pro Tip:
Choose a state management library based on your app size and complexity. For small apps, use RxJS subjects or services with local state before adopting full-scale solutions.
Loading a large number of elements can significantly slow down browser performance. However, leveraging CDK virtual scroll support provides an efficient solution for displaying extensive lists of elements. Virtual scrolling optimizes rendering by dynamically adjusting the height of the container element to match the total number of items and rendering only those that are currently in view.
Template:
Component:
This structure explains the concept and provides a practical example of implementing CDK virtual scroll in an Angular component.
Pro Tip:
Use itemSize appropriately based on the height of your row elements to ensure smooth and accurate scrolling.
Angular provides built-in environment configurations to manage variables specific to each environment, such as development and production. Additional environments can be added, or existing ones can be extended with new variables.
Development Environment: environment.ts
Production Environment: environment.prod.ts
During the build process, Angular automatically selects and applies the environment variables defined in the corresponding environment file (environment.ts for development and environment.prod.ts for production).
Pro Tip:
Store API URLs, analytics tokens, third-party service keys, and feature toggles in environment files to keep your codebase clean and flexible.
Using linters helps enforce consistent coding styles and catches potential issues early in development. Angular projects commonly use:
These tools provide built-in rules and allow you to create custom configurations for project-specific guidelines.
Common TSLint Rules:
Common Stylelint Rules:
Pro Tip:
Integrate linting into your CI/CD pipeline to block commits that violate your defined rules and ensure code hygiene across your team.
Documenting code is crucial for project maintainability and developer onboarding. In Angular, it's best practice to document every variable and method extensively. For methods, use multi-line comments to describe their purpose and explain each parameter.
Tip: Use tools like the 'Document This' Visual Studio extension to automate the generation of detailed JSDoc comments for TypeScript and JavaScript files, ensuring consistent and informative documentation throughout your codebase.
By leveraging Angular's powerful features, such as two-way data binding, modular architecture, and efficient code management, developers can streamline their workflow and enhance the user experience. For businesses seeking expert support in implementing these best practices or developing high-quality software solutions, Ideas2IT offers cutting-edge software development solutions. Talk to an Angular Lead Engineer. Bring your repo. Leave with a plan.
Our front-end engineering teams build Angular apps that scale across performance, security, and usability benchmarks. Whether you're modernizing legacy AngularJS, scaling a complex enterprise UI, or building fresh from scratch, we help you do it right from architecture to deployment.
Didn't find what you were looking for?