

In today's fast-paced digital landscape, ensuring the reliability and functionality of web applications is more critical than ever. As applications become increasingly complex, manual testing is no longer sufficient to keep up with the demands of continuous integration and deployment. This is where Playwright automation comes into play, revolutionizing the way developers and testers approach web application testing.
For example, imagine a scenario where an e-commerce website introduces a new feature for tracking customer orders. Manually testing this feature across various browsers—such as Chrome, Firefox, and Safari—can be time-consuming and prone to human error. With Playwright, teams can automate this process, running comprehensive tests that simulate real user interactions in just a fraction of the time, ensuring that the feature works flawlessly regardless of the browser.
In this blog, we will explore the importance of Playwright test automation in web applications, discussing its key features, best practices to set up automation to help you harness its full potential for your testing needs.
What is Playwright Test Automation?
Playwright is a powerful automation framework developed by Microsoft that enables developers to create robust and reliable end-to-end tests for web applications and web scraping. It allows testing Chromium, Firefox and WebKit with a single API. With its ability to support multiple browsers and platforms, Playwright ensures that applications function seamlessly across different environments. This is crucial for delivering a consistent user experience and maintaining high-quality standards.
Compatible with Windows, Linux, and macOS, Playwright integrates seamlessly with major CI/CD servers like Jenkins, GitHub Actions, and Azure Pipelines. It supports multiple programming languages, including TypeScript, JavaScript, Python, .NET, and Java, making it versatile for QA teams.
One standout feature is Auto-Wait, which ensures elements are ready for interaction, reducing flaky tests by eliminating the need for artificial timeouts. This means that when running tests, the UI is prepared in the background before actions are performed, leading to more stable and reliable testing outcomes.
Why Choose Playwright for Web Automation?
Playwright is an excellent choice for web automation due to its powerful features and flexibility. Here are some key reasons to consider Playwright for your automation needs:
Cross-Browser Support
Playwright enables testing across multiple browsers, including Chromium (Chrome, Edge), Firefox, and WebKit (Safari). This ensures consistent behavior and performance across different environments.
Cross-Platform Support
You can test applications on various platforms, including mobile (Android), web, and desktop (macOS, Linux, Windows), making Playwright a versatile choice for diverse testing scenarios.
Mobile Emulation
Playwright allows for mobile device emulation, simulating geolocation, screen size, and other device-specific characteristics, which is essential for testing mobile-friendly applications.
Multiple Language Support
Playwright supports various programming languages, including TypeScript, JavaScript, Python, .NET, and Java, making it accessible for diverse development teams.
Headless and GUI Modes
It supports both headless mode (for faster execution without a graphical interface) and GUI mode (for development and debugging), providing flexibility based on testing needs.
Integration with CI Tools
Playwright easily integrates with CI/CD environments like Jenkins, GitHub Actions, and Azure Pipelines, facilitating continuous testing and deployment cycles.
Auto-Wait Feature
The built-in Auto-Wait functionality ensures that elements are ready for interaction before any actions are performed, reducing flaky tests and enhancing reliability.
By choosing Playwright, teams can streamline their web automation processes, ensuring high-quality and reliable web applications.
Pre-Requisites
Step-by-Step Guide to Setup Playwright Test Automation Framework
Step 1: Create a New Folder
Navigate to the desired drive on your computer and create a new folder for Playwright (ex: PlaywrightFramework).
Step 2: Open the newly created folder in Visual Studio Code ID
From Visual Studio Code, Navigate to File> Open > Choose the newly created folder (PlaywrightFramework).
Step 3: Create a package.json file
“The package.json file helps to keep track of all node modules installed and, also facilitates the creation of shortcuts to run Playwright tests.
To create the package.json file:
- From your Visual Studio Code, open the terminal.
- Execute the following command:

- Follow the prompts by answering the questions or simply press Enter until the package.json file is generated”
Step 4: Install Playwright Tests npm package
The playwright has its own test runner for end-to-end tests, we call it the Playwright Test.
From your Visual Studio Code > Open Terminal and execute the below command.
npm i -D @playwright/test

Step 5: Install the Playwright npm package
Unlike Playwright Library, Playwright Test does not bundle browsers by default, so you need to install them explicitly.
From your Visual Studio Code > Open Terminal and execute the below command.
npm install --save-dev playwright
Step 6: Create an src Folder inside your Project Folder
Src folder holds all your tests and page objects, it helps us to manage tests in an easy way.
Create New Folder called src inside Project Folder (Ex: PlaywrightFramework).

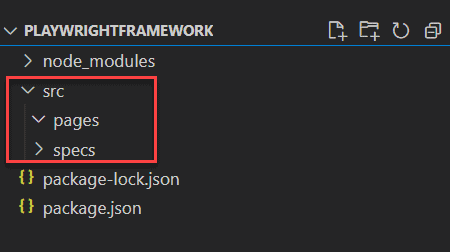
Step 7: Create Folders for Tests and Page Object
Inside your src folder created in the above step, create two more folders namely specs and pages.
Your directory structure should look like the one below.
PlaywrightFramework
-src
--tests
--pages
tests folder contains all your Playwright test files
pages folder contains all your Playwright page object files
Step 8: Create First Page Object File with Playwright
Inside your pages folder create a file name it as example.page.ts
In this tutorial, we are going to write two simple test cases.
- Navigate to google.com and Verify
- Search for the keyword Playwright and verify search results
Copy and paste the below code into your newly created file, example.page.ts
//example.page.ts
import type { Page } from '@playwright/test';
export class ExampleClass{
readonly page: Page
constructor(page:Page){
this.page=page
}
async typeSearchText(){
await this.page.type('inpute="q"]',"Playwright")
}
async pressEnter(){
await this.page.keyboard.press('Enter
}
async searchResult(){
return this.page.innerText('//h3tains(text(),"Playwright:")]')
}
}
Step 9: Create First Test /Spec File with Playwright
Inside your pages folder, create a file and name it, as example.spec.ts
The example.spec.ts contains your actual test script or specs, which you create using Playwright libraries.
Copy and paste the below code into your newly created example.spec.ts
//example.spec.ts
import { test, expect } from '@playwright/test';
import { ExampleClass } from '../pages/example.page';test('Navigatele', async ({ page }) => {
await page.goto('https://google.com/');
const url = await page.url();
expect(url).toContain('google');
});test('Search for Playwright', async ({ page }) => {
await page.goto('https://google.com/');
let exampletest = new ExampleClass(page);
await exampletest.typeSearchText();
await exampletest.pressEnter();
const text = await exampletest.searchResult();
await console.log(text);
expect(text).toContain('Playwright: Fast and reliable');
});
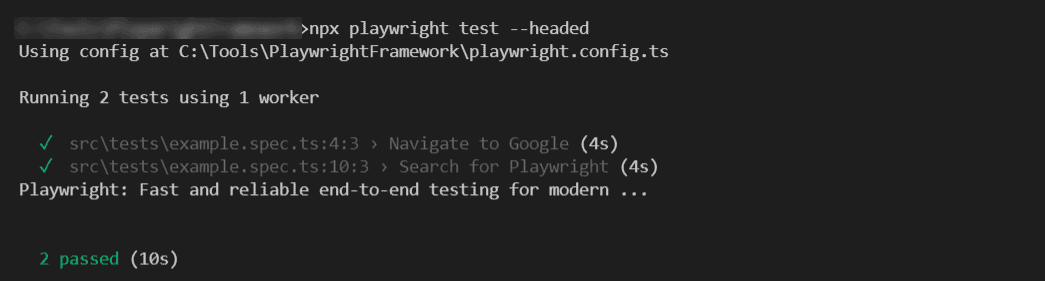
Step 10: Execute or Run Your First Test with a Playwright
The playwright provides options to execute your test in both headed mode and headless mode. Let’s try headed mode execution with the chrome browser.
From your Visual Studio Code Terminal, execute the below command.
npx playwright test --headed
Once your tests are executed, Playwright shows the results in the command line or Visual Studio Terminal.
Configure PlaywrightFramework behavior with the Playwright Global Configuration File
The playwright provides the option to create the configuration file, where you can specify values such as browser name, baseUrl, width, and height.
Create a playwright.config.ts file in your Project Folder (root level)
From your Visual Studio code, Create a new file named playwright.config.ts. This file must be created inside your project folder (ex: PlaywrightFramework) at the root level.
The sample configuration file for Playwright looks as follows.
//playwright.config.ts
import { PlaywrightTestConfig } from '@playwright/test';
const config: PlaywrightTestConfig = {
use: {
baseURL: 'http://google.com/',
browserName: 'chrome',
headless: false,
},
};
export default config;
The above is a sample file; There are many options that Playwright configuration supports.
Playwright Supported Reporters
Currently, Playwright supports reporters
- Dot Reporter
- Line Reporter
- JUnit Reporter
- JSON Reporter
- List Reporter
Playwright allows us to configure multiple reporters as well, Playwright reporters can be mentioned via command line during the execution test, or we can set them in the global configuration file.
Example of the global configuration file for Playwright Reporter:
// playwright.config.ts
import { PlaywrightTestConfig } from '@playwright/test';const config: PlaywrightTestConfig = {
reporter: [ ['junit', { outputFile: 'results.xml' }] ],
};
export default config;
Generating HTML Reporter with Playwright Test Automation Tool
The playwright doesn’t support HTML reports for tests by default, but it supports JUnit XML files. However, using JUnit reporter and third-party npm packages such as XUnit Viewer, we can generate the HTML reporter.
Playwright supports allure reports as well, but as of now, it’s an experimental feature.
Conclusion
Playwright stands out as a powerful tool for web automation, offering a comprehensive suite of features that cater to modern testing needs. Its cross-browser and cross-platform support ensure consistent testing across diverse environments, while its robust automation capabilities simplify complex interactions. As the demand for high-quality web applications continues to grow, adopting Playwright can significantly enhance your testing strategy, streamline workflows, and ultimately lead to better software outcomes. Embrace the future of web automation with Playwright and unlock the full potential of your applications.


.png)


.avif)
.avif)

.avif)


%20Top%20AI%20Agent%20Frameworks%20for%20Autonomous%20Workflows.avif)


%20Understanding%20the%20Role%20of%20Agentic%20AI%20in%20Healthcare.png)
%20AI%20in%20Software%20Development_%20Engineering%20Intelligence%20into%20the%20SDLC.png)
%20AI%27s%20Role%20in%20Enhancing%20Quality%20Assurance%20in%20Software%20Testing.png)

.png)


%20Tableau%20vs.%20Power%20BI_%20Which%20BI%20Tool%20is%20Best%20for%20You_.avif)
%20AI%20in%20Data%20Quality_%20Cleansing%2C%20Anomaly%20Detection%20%26%20Lineage.avif)
%20Key%20Metrics%20%26%20ROI%20Tips%20To%20Measure%20Success%20in%20Modernization%20Efforts.avif)
%20Hybrid%20Cloud%20Strategies%20for%20Modernizing%20Legacy%20Applications.avif)
%20Harnessing%20Kubernetes%20for%20App%20Modernization%20and%20Business%20Impact.avif)
%20Monolith%20to%20Microservices_%20A%20CTO_s%20Decision-Making%20Guide.avif)
%20Application%20Containerization_%20How%20To%20Streamline%20Your%20Development.avif)
%20ChatDB_%20Transforming%20How%20You%20Interact%20with%20Enterprise%20Data.avif)
%20Catalyzing%20Next-Gen%20Drug%20Discovery%20with%20Artificial%20Intelligence.avif)
%20AI%20Agents_%20Digital%20Workforce%2C%20Reimagined.avif)
%20How%20Generative%20AI%20Is%20Revolutionizing%20Customer%20Experience.avif)
%20Leading%20LLM%20Models%20Comparison_%20What%E2%80%99s%20the%20Best%20Choice%20for%20You_.avif)
%20Generative%20AI%20Strategy_%20A%20Blueprint%20for%20Business%20Success.avif)
%20Mastering%20LLM%20Optimization_%20Key%20Strategies%20for%20Enhanced%20Performance%20and%20Efficiency.avif)

.avif)


.avif)


.avif)


.avif)


