

Installing, running, and managing postgres in a local machine for application development is not difficult anymore. There is a simple way to get started with the installation and configuration right away using Docker. Through Docker, you can skip all the complex installation steps otherwise required for using PSQL in local development. You can now kick-start the development of postgres based applications in just a few seconds.
To get started, follow these steps:
- Install docker
- Create a postgres server within a docker container (which can be accessed by GUI or other applications needed for development).
- Make the postgres container accessible through CLI.
- Install the PgAdmin4 browser version to access the Postgres server from GUI.
Install and Configure PSQL using Docker:
Run the following command in Linux, Windows, or Mac machines from the terminal or command-prompt to pull PSQL from docker-hub.
docker run --name postgresql-container -p 5432:5432 -e POSTGRES_PASSWORD=somePassword -d postgres
In the above command replace
- postgresql-container with a preferable container name if necessary.
- somePassword with a password to authenticate and connect to the postgres (in application with connection string as well as the PG-admin viewer).
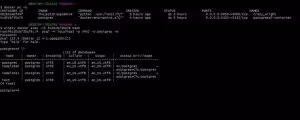
You will be able to see a new container created and running at 0.0.0.0:5432. To verify, use the command:
docker ps -a

The postgres server is now running in the IP of your local machine. The PostgresQL server is now ready to use for development.
Install PG-admin using Docker:
Download the pgAdmin-4 browser version from docker-hub using the following command.
docker run --rm -p 5050:5050 thajeztah/pgadmin4
Now manage your postgres server from the browser by launching http://localhost:5050.

To connect the PSQL server in pgAdmin
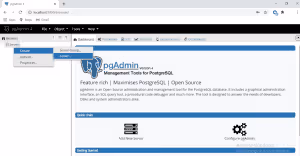
Enter the credentials to save and manage PSQL via GUI.
Host - The IP address of your machine
Password - Password used while creating the PSQL server with docker

Connecting to the PSQL server via CLI
The steps below are to connect to the psql server from CLI
- Find the docker-container-id in which the postgres is running using the below command. docker ps -a
- Run the below command to enter into the container (with the ID from step-1).docker exec -it <PSQL-Container-ID> bash
- Authenticate to start using as postgres user. psql -h localhost -p 5432 -U postgres -W
- Enter the password used while creating the PSQL server container.
Connecting to the PSQL server via application :
(example: JavaScript)
const { Client } = require('pg');
let client = new Client({
connectionString: "postgresql://postgres:test1234@192.168.225.86:5432/postgres"
});
const connectDB = async () => {
try {
console.log('Connect to Postgres ...');
client.connect();
await new Promise((resol, rej) => {
client.query('Select now() as run_at;', (err, res) => {
if(err) {
console.log(err);
reject(err);
} else {
console.log(`Run at date-time : ${res.rows[0].run_at}`);
resol(res.rows[0].run_at);
}
})
});
await client.end();
console.log('Execution Completed ...');
} catch (err) {
console.log('Error while Connecting DB !')
}
}
connectDB();
Please note that these steps simplify the development process. You may choose to follow the conventional method of installing PSQL separately for the production environment if you prefer to.
About Ideas2IT:
Are you looking to build a great product or service? Do you foresee technical challenges? If you answered yes to the above questions, then you must talk to us. We are a world-class Custom dot net development company. We take up projects that are in our area of expertise. We know what we are good at and more importantly what we are not. We carefully choose projects where we strongly believe that we can add value. And not just in engineering but also in terms of how well we understand the domain. Book a free consultation with us today. Let’s work together.


.avif)
.avif)

.avif)


%20Top%20AI%20Agent%20Frameworks%20for%20Autonomous%20Workflows.avif)


%20Understanding%20the%20Role%20of%20Agentic%20AI%20in%20Healthcare.png)
%20AI%20in%20Software%20Development_%20Engineering%20Intelligence%20into%20the%20SDLC.png)
%20AI%27s%20Role%20in%20Enhancing%20Quality%20Assurance%20in%20Software%20Testing.png)

.png)


%20Tableau%20vs.%20Power%20BI_%20Which%20BI%20Tool%20is%20Best%20for%20You_.avif)
%20AI%20in%20Data%20Quality_%20Cleansing%2C%20Anomaly%20Detection%20%26%20Lineage.avif)
%20Key%20Metrics%20%26%20ROI%20Tips%20To%20Measure%20Success%20in%20Modernization%20Efforts.avif)
%20Hybrid%20Cloud%20Strategies%20for%20Modernizing%20Legacy%20Applications.avif)
%20Harnessing%20Kubernetes%20for%20App%20Modernization%20and%20Business%20Impact.avif)
%20Monolith%20to%20Microservices_%20A%20CTO_s%20Decision-Making%20Guide.avif)
%20Application%20Containerization_%20How%20To%20Streamline%20Your%20Development.avif)
%20ChatDB_%20Transforming%20How%20You%20Interact%20with%20Enterprise%20Data.avif)
%20Catalyzing%20Next-Gen%20Drug%20Discovery%20with%20Artificial%20Intelligence.avif)
%20AI%20Agents_%20Digital%20Workforce%2C%20Reimagined.avif)
%20How%20Generative%20AI%20Is%20Revolutionizing%20Customer%20Experience.avif)
%20Leading%20LLM%20Models%20Comparison_%20What%E2%80%99s%20the%20Best%20Choice%20for%20You_.avif)
%20Generative%20AI%20Strategy_%20A%20Blueprint%20for%20Business%20Success.avif)
%20Mastering%20LLM%20Optimization_%20Key%20Strategies%20for%20Enhanced%20Performance%20and%20Efficiency.avif)

.avif)


.avif)


.avif)


.avif)


