

A centralized Identity system a la SSN in the USA has been sorely lacking in India. But with the critical mass the Aadhaar scheme has gained and the API ecosystem maturing around it, finally, we have a viable option for identity.We have been leveraging this in many applications to implement disruptive use cases like social lending.Here, we are going to show how to integrate Aadhaar verification using Aadhaar Bridge in Laravel.
Aadhaar Bridge Flow Diagram
Following are the steps to achieve the verification process
- Create Digital Signature Agreement
- IP Whitelisting
- Server Setup
- Integration with Laravel
1. Create Digital Signature Agreement
- To create a digital agreement, we have to register in the Aadhaar Bridge website. There are four Aadhaar verification transactions available. We have created an account in the Aadhaar Bridge for “AUTH” Aadhaar transactions.
- Click on the link and perform the “Sign-Up” process. After this, the User will receive the User Activation link via Email post which the User should create an account.
- To create the Digital Agreement(SUB AUA Agreement) we have to log in to the site and download the agreement. Upload the signed agreement in the same Aadhaar Bridge URL as shown in the figure below. Once the agreement verification and validation are performed, the account will be activated.
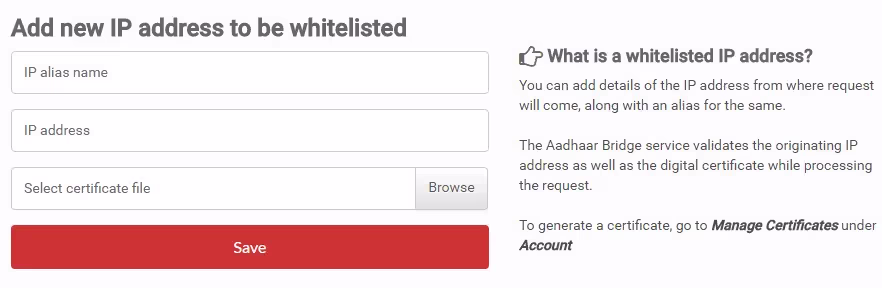
2. IP Whitelisting
- To Whitelist the IP from which our request will be originating, we have to create .cer file and upload in the following form:
2.1 Create a private key with a validity
keytool -genkey
-alias ALIAS_NAME
-keyalg RSA
-keystore COMP_NAME.jks
-keysize 2048
-dname “CN=COMMON_NAME, EMAILADDRESS=sample@abc.com, C=IN,
OU=ORG_UNIT, O=ORGANIZATION_NAME”
2.2 Create CSR (Certificate Signing Request) for the above key
keytool -certreq -alias ALIAS_NAME -file COMP_NAME.csr -keystore COMP_NAME.jks
Details to be ensured while generating the “CSR” through the terminal window by the customer:
- ALIAS_NAME: This could be anything.
- COMP_NAME: This could be anything.
- COMMON_NAME: This should be the same as the contact person’s name.
- sample@abc.com: This should be the same as the login email id.
- ORG_UNIT: Value should be “Khosla Labs”
- ORGANIZATION_NAME: This should be the same as the organization name in the Sub-AUA’s profile for an organization. Can be anything for an individual.
Generation of a new Certificate: Once the CSR file is generated, generate the certificate by uploading the CSR on the same page itself. If the CSR file is validated, a certificate will be generated and thereafter will be shown on the screen. Download the certificate and save it in the local system.
3. Server Setup
To set up the server we need to download the setup zip file from the following link:
Resources –>JAVA DEVELOPERS
The Setup Zip file will contain the .jar and application.properties files. We need to configure the application.properties file to complete the server setup.
Generating and adding the P12 file path is one of the important configuration processes. Run the following command to generate the P12 file
keytool -importkeystore
-srckeystore COMP_NAME.jks
-destkeystore COMP_NAME.p12
-srcstoretype jks
-deststoretype pkcs12
In the application properties file, enter the configuration based on our profile. URLs for the same are mentioned below:
PropertyEndpoint
- keystore.locationP12 file location
- keystore.passPassword (Same password what we have used to generate the .jks file)
- keystore.aliasAlias name
- x09cert.location.cer file locationaua.host.auth.urlhttps://bridge.aadhaarconnect.com/aua/auth
- subaua.codeSUB AUA Code
- timeout.in.secTime limit
- server.portPort number
Once the properties file is configured with our certificate location, keystore passcode, service URL and SubAUA code, run the gateway application using the following command:java -jar aadhaar-gateway-.jar
(Note : On Executing the command, the JAR will auto-launch the Tomcat server, which requires Java-7 to be installed on our server.)
4.Integration with Laravel
Here are a few code snippets for the Laravel API calls.Sample Base URL:
https://128.199.50.45:5181 (server is running on IP 128.199.50.45 at port 5181)
Add the following route in the routes.php:Route::group(['prefix' => 'aadhaar/'], function () {
Route::post('verification', 'AadhaarVerificationController@adhaarVerification');
});
Add the following controller file AadhaarVerificationController.php with function adhaarVerificationpublic function adhaarVerification(Request $request)
{
$validator = Validator::make($request->all(), [
'aadhaarid' => 'required',
'name' => 'required',
'pincode' => 'required'
]);
if ($validator->fails()) {
return response(array(
'message' => 'parameters missing',
'missing_parameters' => $validator->errors()
), 400);
}
$aadhaarid = $request->input('aadhaarid');
$name = $request->input('name');
$pincode = $request->input('pincode');
$client = new Client([ 'headers' => [ 'Content-Type' => 'application/json' ]]);
$res = $client->post('https://128.199.50.45:5181/auth/raw',
['body' => json_encode(
['aadhaar-id'=>$aadhaarid,
"location" => ["type" => "pincode", "pincode" => $pincode ],
"modality" => "demo",
"certificate-type" => "prod",
"demographics" =>
["name" =>
["matching-strategy" => "exact", "name-value" => $name]
]
]
)]
);
if($res->getStatusCode()==200){
if($reply->success){
$reply=json_decode($res->getBody()->getContents());
return response()->json(['message'=>'Aadhaar Verification Successful'],200);
} else{
return response()->json(['errmessage'=>'Aadhaar Verification Not Successful'],400);
}
} else{
return response()->json(['errmessage'=>'Aadhaar Verification Not Successful'],400);
}
}
Sample API call for Aadhaar verification:https://128.199.50.45:8000/api/v1/aadhaar/verification
Input:{"aadhaarid":"640000000000","name":,"pincode":"600000"}
Output:{"message":"Aadhaar Verification Successful"}
Therefore, integrating Aadhaar verification using Aadhaar Bridge in Laravel represents a significant advancement in leveraging India's centralized identity system.
Our detailed guide has outlined the necessary steps—from digital agreement creation and IP whitelisting to server setup and Laravel integration—to seamlessly incorporate Aadhaar verification into healthcare and other applications.
Take steps towards enhancing your system's security and efficiency by implementing Aadhaar verification today. Contact us to explore how we can help streamline your authentication processes with RPA-driven solutions tailored to your needs.


.png)


.avif)
.avif)

.avif)


%20Top%20AI%20Agent%20Frameworks%20for%20Autonomous%20Workflows.avif)


%20Understanding%20the%20Role%20of%20Agentic%20AI%20in%20Healthcare.png)
%20AI%20in%20Software%20Development_%20Engineering%20Intelligence%20into%20the%20SDLC.png)
%20AI%27s%20Role%20in%20Enhancing%20Quality%20Assurance%20in%20Software%20Testing.png)

.png)


%20Tableau%20vs.%20Power%20BI_%20Which%20BI%20Tool%20is%20Best%20for%20You_.avif)
%20AI%20in%20Data%20Quality_%20Cleansing%2C%20Anomaly%20Detection%20%26%20Lineage.avif)
%20Key%20Metrics%20%26%20ROI%20Tips%20To%20Measure%20Success%20in%20Modernization%20Efforts.avif)
%20Hybrid%20Cloud%20Strategies%20for%20Modernizing%20Legacy%20Applications.avif)
%20Harnessing%20Kubernetes%20for%20App%20Modernization%20and%20Business%20Impact.avif)
%20Monolith%20to%20Microservices_%20A%20CTO_s%20Decision-Making%20Guide.avif)
%20Application%20Containerization_%20How%20To%20Streamline%20Your%20Development.avif)
%20ChatDB_%20Transforming%20How%20You%20Interact%20with%20Enterprise%20Data.avif)
%20Catalyzing%20Next-Gen%20Drug%20Discovery%20with%20Artificial%20Intelligence.avif)
%20AI%20Agents_%20Digital%20Workforce%2C%20Reimagined.avif)
%20How%20Generative%20AI%20Is%20Revolutionizing%20Customer%20Experience.avif)
%20Leading%20LLM%20Models%20Comparison_%20What%E2%80%99s%20the%20Best%20Choice%20for%20You_.avif)
%20Generative%20AI%20Strategy_%20A%20Blueprint%20for%20Business%20Success.avif)
%20Mastering%20LLM%20Optimization_%20Key%20Strategies%20for%20Enhanced%20Performance%20and%20Efficiency.avif)

.avif)


.avif)


.avif)


.avif)


